
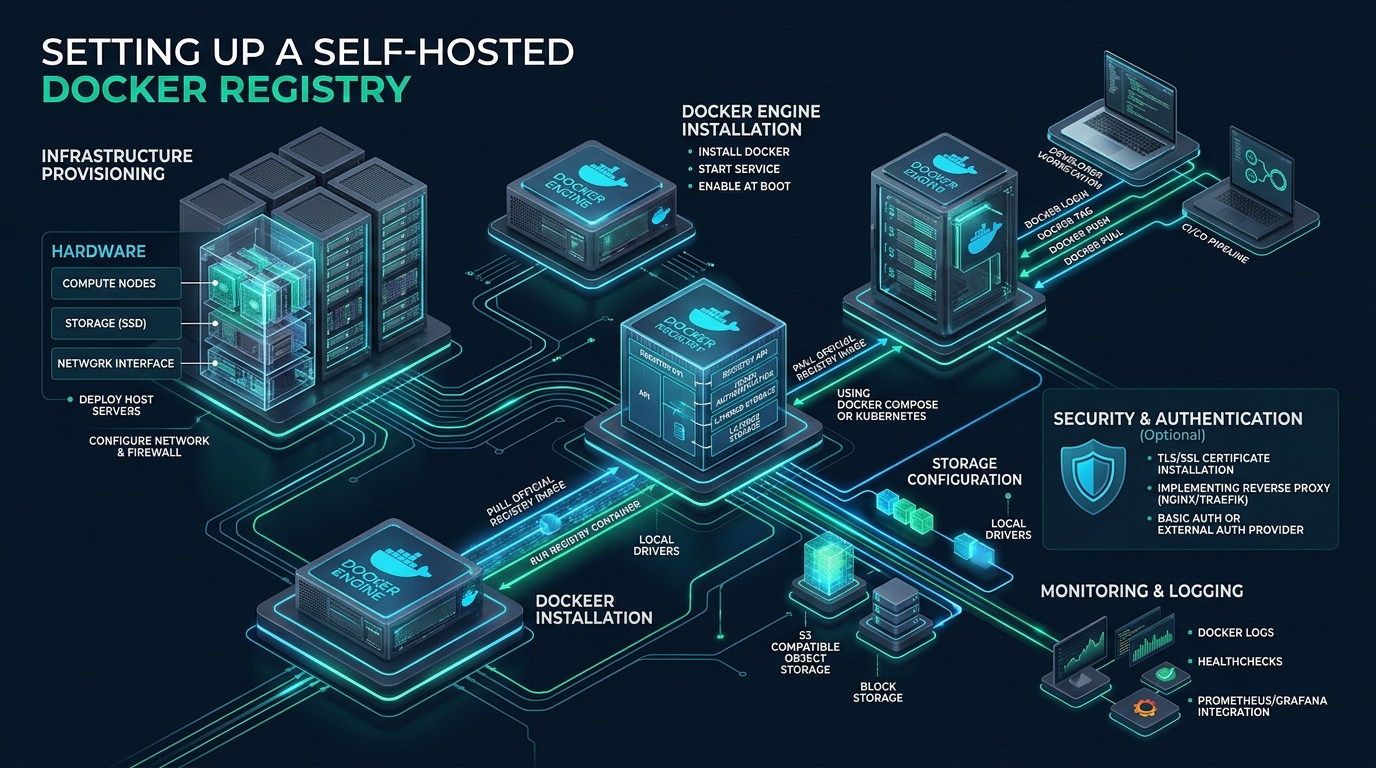
Enterprise continuous integration pipelines frequently stall when public container registries throttle traffic with aggressive rate limits, upstream network congestion, or egress transit bottlenecks. Engineering teams deploying staging clusters or private microservices on CpanelFree often find that centralized cloud registries introduce unneeded latency and external dependencies into standard build-and-test loops. Setting up an autonomous, self-hosted Docker registry within your private network or dedicated infrastructure resolves these throughput bottlenecks while enforcing strict data governance and instantaneous image caching.
What is a Self-Hosted Docker Registry and When Should You Deploy One?
Direct Answer: A self-hosted Docker registry is a privately managed deployment of the OCI Distribution Specification (Registry v2) that stores, indexes, and distributes container image layers inside your own network perimeter. It eliminates public rate limits, reduces layer pull times from minutes to milliseconds, prevents proprietary code leaks, and eliminates recurring outbound cloud egress bandwidth costs.
Modern container-driven software architectures rely on an Open Container Initiative (OCI) image distribution engine to broker artifacts between build runners, staging environments, and production clusters. When you run docker push or docker pull, the Docker daemon does not transmit a monolithic virtual machine image. Instead, it negotiates an HTTP/2 REST API transaction that streams individual content-addressable filesystem layers (blobs) formatted as compressed tar archives, tracked by a JSON-formatted image manifest.
Public container hubs enforce aggressive anonymous pull restrictions—often capping anonymous clients at 100 pulls per six hours and authenticated free accounts at 200 pulls per six hours. In automated CI/CD pipelines where test runners trigger hundreds of builds daily, reaching these thresholds causes immediate build failures. Running your own self-hosted Docker registry creates an isolated caching and storage sanctuary with zero arbitrary quotas, guaranteed LAN-speed distribution, and full operational sovereignty.
Architecture Note: The official Docker Distribution Registry (version 2.x) stores images by their cryptographic SHA256 digest. Layers shared across different containers—such as shared base OS layers (Debian, Alpine) or runtime runtimes (Node.js, Python)—are stored once on disk, saving substantial storage capacity while speeding up multi-stage deployment builds.
Architectural Comparison: Public Registries vs. Self-Hosted Infrastructure
Evaluating whether to maintain your own container storage infrastructure versus outsourcing to third-party managed services requires assessing bandwidth latency, egress economics, and security isolation. The matrix below contrasts default public registries against a tuned self-hosted production deployment.
| Feature / Metric | Standard / Default (Public Hub) | Tuned / Production (Self-Hosted) |
|---|---|---|
| Pull Latency (Local LAN / VPC) | 350ms – 1800ms (WAN Dependent) | 8ms – 35ms (Pure NVMe LAN) |
| API Rate Limiting | Strict (100–200 pulls / 6 hrs) | Unlimited (Hardware Capacity Only) |
| Storage Backend Flexibility | Vendor Proprietary / Closed | Local NVMe, S3, MinIO, Ceph, GCS |
| Network Egress Costs | $0.05 – $0.09 per GB transferred | $0.00 (Zero Internal Bandwidth Fees) |
| Network Isolation | Public Internet Endpoint Required | Full Air-Gap & Private VPC Capability |
| Authentication Integration | SaaS Identity / Vendor SSO Tier | htpasswd, LDAP, OAuth2, Mutual TLS |
| Data Governance & Compliance | Third-Party Multi-Tenant Cloud | 100% Single-Tenant Data Ownership |
Host Kernel Tuning and System Prerequisites
A high-concurrency container registry handles hundreds of concurrent TCP connections during simultaneous CI runner pulls. Large layers (often 500MB to 2GB) require optimized socket buffer allocations, expanded connection backlogs, and raised file descriptor limits to prevent connection timeouts and packet retransmissions.
Create a dedicated sysctl configuration file at /etc/sysctl.d/99-docker-registry.conf to tune the Linux networking stack for high-throughput blob streaming:
# /etc/sysctl.d/99-docker-registry.conf
# Linux Kernel Optimization for High-Concurrency Container Registry

# Increase maximum open file handles system-wide
fs.file-max = 2097152

# Enhance socket listen backlog for concurrent incoming pulls
net.core.somaxconn = 65535
net.ipv4.tcp_max_syn_backlog = 65535

# Expand network interface backlog queue
net.core.netdev_max_backlog = 16384

# Allocate larger TCP send and receive buffers for multi-megabyte layer transfers
net.core.rmem_max = 16777216
net.core.wmem_max = 16777216
net.ipv4.tcp_rmem = 4096 87380 16777216
net.ipv4.tcp_wmem = 4096 65536 16777216

# Enable TCP BBR congestion control algorithm for low-latency transfers
net.core.default_qdisc = fq
net.ipv4.tcp_congestion_control = bbr

# Enable TCP window scaling and fast open
net.ipv4.tcp_window_scaling = 1
net.ipv4.tcp_fastopen = 3

# Reuse TIME_WAIT sockets for outgoing connections
net.ipv4.tcp_tw_reuse = 1

# Expand ephemeral port range
net.ipv4.ip_local_port_range = 10240 65535
Apply the kernel parameters immediately without rebooting by executing:
sudo sysctl --systemIn addition to kernel tuning, set user-level file limits in /etc/security/limits.d/99-registry.conf:
# /etc/security/limits.d/99-registry.conf
*    soft    nofile    1048576
*    hard    nofile    1048576
*    soft    nproc     65536
*    hard    nproc     65536
Production Directory Structure and Authentication Setup
Production container registries should never expose the raw Go distribution daemon directly to untrusted networks. The robust enterprise architecture consists of the official registry:2 container operating on an internal Docker bridge network, fronted by a hardened Nginx reverse proxy handling TLS termination, client body buffering, and HTTP Basic authentication.
Initialize the isolated workspace directory structure on your host filesystem:
sudo mkdir -p /opt/docker-registry/{auth,certs,config,data,nginx}
cd /opt/docker-registry
Generate a secure password hash file using htpasswd with bcrypt hashing (which provides substantial cryptographic resistance compared to obsolete MD5 or crypt hashes):
# Install apache2-utils if htpasswd is not present
# Debian/Ubuntu: sudo apt-get install -y apache2-utils
# RHEL/AlmaLinux: sudo dnf install -y httpd-tools

sudo htpasswd -B -b -c /opt/docker-registry/auth/htpasswd registryadmin "YourSecureProductionPassPhrase2026!"
sudo chmod 600 /opt/docker-registry/auth/htpasswd
Security Advisory: The Docker daemon strictly refuses to send plaintext credentials over unencrypted HTTP connections. While Docker supports an
insecure-registriesflag for local loopback testing, doing so in production exposes image layers and authentication headers to on-path interception. You must always terminate connections with valid TLS.
Registry Engine Configuration (config.yml)
The Registry v2 configuration file controls storage backends, HTTP socket behavior, cache headers, and manifest deletion capabilities. By default, deletion of container manifests is disabled, which prevents disk reclamation routines from functioning. Enable deletion explicitly in the configuration.
Create /opt/docker-registry/config/config.yml:
# /opt/docker-registry/config/config.yml
version: 0.1
log:
  level: info
  fields:
    service: registry
    environment: production

storage:
  cache:
    blobdescriptor: inmemory
  filesystem:
    rootdirectory: /var/lib/registry
    maxthreads: 100
  maintenance:
    uploadpurging:
      enabled: true
      age: 168h
      interval: 24h
      dryrun: false
  delete:
    enabled: true
  redirect:
    disable: true

http:
  addr: :5000
  headers:
    X-Content-Type-Options: [nosniff]
    X-Frame-Options: [DENY]
    X-XSS-Protection: ["1; mode=block"]
    Strict-Transport-Security: ["max-age=31536000; includeSubDomains"]

health:
  storagedriver:
    enabled: true
    interval: 10s
    threshold: 3
Hardened Nginx Reverse Proxy Configuration
When clients push Docker images, multi-gigabyte layers are streamed using HTTP PUT and PATCH requests. Default Nginx installations restrict client upload payloads to 1MB (via client_max_body_size 1m;) and attempt to buffer entire request bodies to temporary disk files before passing them upstream. This default behavior causes catastrophic HTTP 413 Request Entity Too Large failures during Docker pushes.
Place the following production-grade configuration in /opt/docker-registry/nginx/registry.conf:
# /opt/docker-registry/nginx/registry.conf
upstream docker_registry_backend {
    server registry:5000;
    keepalive 64;
}

# Redirect HTTP to HTTPS
server {
    listen 80;
    listen [::]:80;
    server_name registry.yourdomain.com;
    return 301 https://$host$request_uri;
}

server {
    listen 443 ssl http2;
    listen [::]:443 ssl http2;
    server_name registry.yourdomain.com;

    # SSL / TLS Modern Cryptography
    ssl_certificate /etc/nginx/certs/fullchain.pem;
    ssl_certificate_key /etc/nginx/certs/privkey.pem;
    ssl_protocols TLSv1.2 TLSv1.3;
    ssl_ciphers 'ECDHE-ECDSA-AES128-GCM-SHA256:ECDHE-RSA-AES128-GCM-SHA256:ECDHE-ECDSA-AES256-GCM-SHA384:ECDHE-RSA-AES256-GCM-SHA384:DHE-RSA-AES128-GCM-SHA256:DHE-RSA-AES256-GCM-SHA384';
    ssl_prefer_server_ciphers on;
    ssl_session_cache shared:SSL:50m;
    ssl_session_timeout 1d;
    ssl_session_tickets off;

    # Crucial Docker Registry directives:
    # 1. Disable maximum upload limit for gigabyte image layers
    client_max_body_size 0;

    # 2. Disable request and response buffering for instant streaming
    proxy_request_buffering off;
    proxy_buffering off;

    # Forwarding Headers required by Docker Registry V2 API
    proxy_set_header Host $http_host;
    proxy_set_header X-Real-IP $remote_addr;
    proxy_set_header X-Forwarded-For $proxy_add_x_forwarded_for;
    proxy_set_header X-Forwarded-Proto $scheme;

    # Timeouts for sustained high-capacity layer uploads
    proxy_read_timeout 900s;
    proxy_send_timeout 900s;
    send_timeout 900s;

    location / {
        # Check Docker client user agent header or enforce auth
        auth_basic "Private Docker Registry";
        auth_basic_user_file /etc/nginx/auth/htpasswd;

        proxy_pass http://docker_registry_backend;
        proxy_http_version 1.1;
        proxy_set_header Connection "";
    }

    # Lightweight Docker Ping Endpoint
    location /v2/ {
        auth_basic "Private Docker Registry";
        auth_basic_user_file /etc/nginx/auth/htpasswd;

        proxy_pass http://docker_registry_backend;
        proxy_http_version 1.1;
        proxy_set_header Connection "";

        # Docker client specifically looks for Docker-Distribution-Api-Version header
        add_header 'Docker-Distribution-Api-Version' 'registry/2.0' always;
    }
}
Production Docker Compose Stack Deployment
Now orchestrate both containers using Docker Compose. The configuration binds the registry container exclusively to an internal container bridge network, leaving the Nginx container as the sole exposed listener on ports 80 and 443.
Create /opt/docker-registry/docker-compose.yml:
# /opt/docker-registry/docker-compose.yml
version: '3.8'

services:
  registry:
    image: registry:2.8.3
    container_name: docker-registry-engine
    restart: always
    environment:
      REGISTRY_STORAGE_DELETE_ENABLED: "true"
    volumes:
      - /opt/docker-registry/config/config.yml:/etc/docker/registry/config.yml:ro
      - /opt/docker-registry/data:/var/lib/registry
    networks:
      - registry-internal
    healthcheck:
      test: ["CMD", "wget", "-q", "--spider", "http://127.0.0.1:5000/v2/"]
      interval: 15s
      timeout: 5s
      retries: 3
      start_period: 10s
    logging:
      driver: "json-file"
      options:
        max-size: "50m"
        max-file: "5"

  nginx:
    image: nginx:1.27-alpine
    container_name: docker-registry-proxy
    restart: always
    ports:
      - "80:80"
      - "443:443"
    volumes:
      - /opt/docker-registry/nginx/registry.conf:/etc/nginx/conf.d/default.conf:ro
      - /opt/docker-registry/auth:/etc/nginx/auth:ro
      - /opt/docker-registry/certs:/etc/nginx/certs:ro
    depends_on:
      registry:
        condition: service_healthy
    networks:
      - registry-internal
    logging:
      driver: "json-file"
      options:
        max-size: "50m"
        max-file: "5"

networks:
  registry-internal:
    driver: bridge
    ipam:
      driver: default
      config:
        - subnet: 172.28.0.0/16
Launch the service stack in detached mode:
sudo docker compose up -dVerify that both containers achieve healthy operational status:
sudo docker compose psSystemd Service Unit for Autonomous Lifecycle Management
To guarantee that your Docker registry initializes automatically across host reboots and integrates with host-level log collectors, package the Compose stack inside a systemd management unit.
Create /etc/systemd/system/docker-registry.service:
# /etc/systemd/system/docker-registry.service
[Unit]
Description=Self-Hosted Docker Registry Stack
After=docker.service network-online.target
Requires=docker.service
Wants=network-online.target

[Service]
Type=oneshot
RemainAfterExit=yes
WorkingDirectory=/opt/docker-registry
ExecStart=/usr/bin/docker compose -f /opt/docker-registry/docker-compose.yml up -d --remove-orphans
ExecStop=/usr/bin/docker compose -f /opt/docker-registry/docker-compose.yml down
ExecReload=/usr/bin/docker compose -f /opt/docker-registry/docker-compose.yml restart
TimeoutStartSec=120
TimeoutStopSec=60

# Sandboxing and Security Restrictions
ProtectSystem=full
ProtectHome=read-only
PrivateTmp=true

[Install]
WantedBy=multi-user.target
Enable and start the service with standard systemctl directives:
sudo systemctl daemon-reload
sudo systemctl enable docker-registry.service
sudo systemctl start docker-registry.service
sudo systemctl status docker-registry.service
Client Authentication and Image Lifecycle Verification
Once your registry is operational, verify end-to-end functionality from a remote development workstation or CI runner agent. First, authenticate against the registry endpoint using your generated credentials:
docker login registry.yourdomain.com -u registryadminWhen prompted, enter your password. Upon successful authentication, Docker writes an encoded token to ~/.docker/config.json. Next, pull a standard lightweight image, re-tag it with your custom registry prefix, and push it to your private infrastructure:
# Pull an upstream baseline image
docker pull alpine:3.20

# Re-tag for your private registry namespace
docker tag alpine:3.20 registry.yourdomain.com/infra/alpine:3.20

# Push layers to your self-hosted registry
docker push registry.yourdomain.com/infra/alpine:3.20
Verify that the image catalog index contains your uploaded repository using the OCI v2 REST API:
curl -u registryadmin:"YourSecureProductionPassPhrase2026!" https://registry.yourdomain.com/v2/_catalogThe server returns a JSON response listing the repositories stored in the backend:
{"repositories":["infra/alpine"]}To inspect specific tags associated with an image repository, query the tag list endpoint:
curl -u registryadmin:"YourSecureProductionPassPhrase2026!" https://registry.yourdomain.com/v2/infra/alpine/tags/list{"name":"infra/alpine","tags":["3.20"]}Storage Maintenance and Garbage Collection Procedures
One of the most misunderstood aspects of Docker Registry administration is storage reclamation. When you delete an image manifest via the REST API or UI tools, the Docker Registry marks the manifest reference as unlinked, but does not delete the underlying layer blobs. Blobs remain on disk to prevent race conditions during concurrent push operations.
Operational Warning: Never execute registry garbage collection while the registry is actively accepting write operations. Doing so can delete layers currently being pushed by CI runners, corrupting manifests. Always place the registry in read-only mode during garbage collection.
To safely reclaim disk space occupied by orphaned layer blobs, execute the garbage collection utility through the container binary:
# Step 1: Run a dry run to inspect eligible orphaned blobs without deleting
sudo docker exec -it docker-registry-engine bin/registry garbage-collect --dry-run /etc/docker/registry/config.yml

# Step 2: Execute actual garbage collection to purge unreferenced blobs
sudo docker exec -it docker-registry-engine bin/registry garbage-collect /etc/docker/registry/config.yml

# Step 3: Remove empty upload staging directories
sudo docker exec -it docker-registry-engine bin/registry garbage-collect -m /etc/docker/registry/config.yml
Automate this routine weekly via an administrative cron job scheduled during off-peak deployment maintenance windows:
# /etc/cron.d/docker-registry-gc
# Run registry garbage collection every Sunday at 03:00 UTC
0 3 * * 0 root /usr/bin/docker exec docker-registry-engine bin/registry garbage-collect -m /etc/docker/registry/config.yml > /var/log/registry-gc.log 2>&1
Production Sizing and Infrastructure Optimization
When scaling beyond single-node prototypes to enterprise production workloads with dozens of concurrent CI runner nodes pushing multi-gigabyte layers, network I/O and storage throughput become critical bottlenecks. Provisioning your registry on high-throughput, low-latency NVMe infrastructure such as MeraHost Enterprise Cloud guarantees dedicated unmetered uplink speeds and predictable operational costs with zero unexpected renewal hikes.
For distributed teams operating across multiple geographic regions, configure your local registry as a pull-through cache proxying upstream images. In this topology, developers point their Docker daemon to the private registry; if an image layer is missing locally, the registry fetches it once from the origin and serves all subsequent cluster requests directly from local NVMe cache at wire speed.
Frequently Asked Questions (FAQ)
Can I run a self-hosted Docker registry without SSL/TLS certificates?
While technically possible by adding your registry domain to the insecure-registries array in /etc/docker/daemon.json on every client, this is strongly discouraged in production. Plain HTTP transmits basic authentication credentials in base64 without encryption and leaves container images vulnerable to man-in-the-middle tampering. Using free Let’s Encrypt certificates or internal corporate CA certificates with Nginx TLS termination eliminates this security vulnerability.
Why did my host disk space not decrease after deleting an image tag?
Deleting a tag or manifest via the Registry API merely unlinks the tag pointer from the manifest digest. The actual filesystem layers (blobs) remain intact on disk to prevent corruption of images sharing identical layers. To reclaim physical disk space, you must execute the garbage collector tool: docker exec -it docker-registry-engine bin/registry garbage-collect /etc/docker/registry/config.yml while the registry is in a quiescent state.
How do I resolve “HTTP 413 Request Entity Too Large” errors when pushing layers?
This error occurs when the reverse proxy (Nginx) enforces default client upload payload limits (usually 1MB). To resolve this, configure client_max_body_size 0; inside your Nginx server block. Additionally, disable request body buffering with proxy_request_buffering off; and proxy_buffering off; so multi-gigabyte layers stream directly to the registry backend without filling proxy storage partitions.
How can I back up my self-hosted Docker registry?
Backing up the registry requires archiving the persistent storage root (by default /opt/docker-registry/data) alongside configuration files and authentication tables. Because the registry filesystem is strictly content-addressable and immutable once written, you can create consistent snapshots using LVM snapshots, ZFS send/receive, or daily incremental rsync jobs to remote secondary storage without stopping read traffic.
Deploy Enterprise-Grade Production Infrastructure
Need guaranteed performance with zero price hikes? Host mission-critical workloads on MeraHost with pure Enterprise NVMe, LiteSpeed Web Server, and Same Renewal Price, Always (starting at ₹99/mo).