
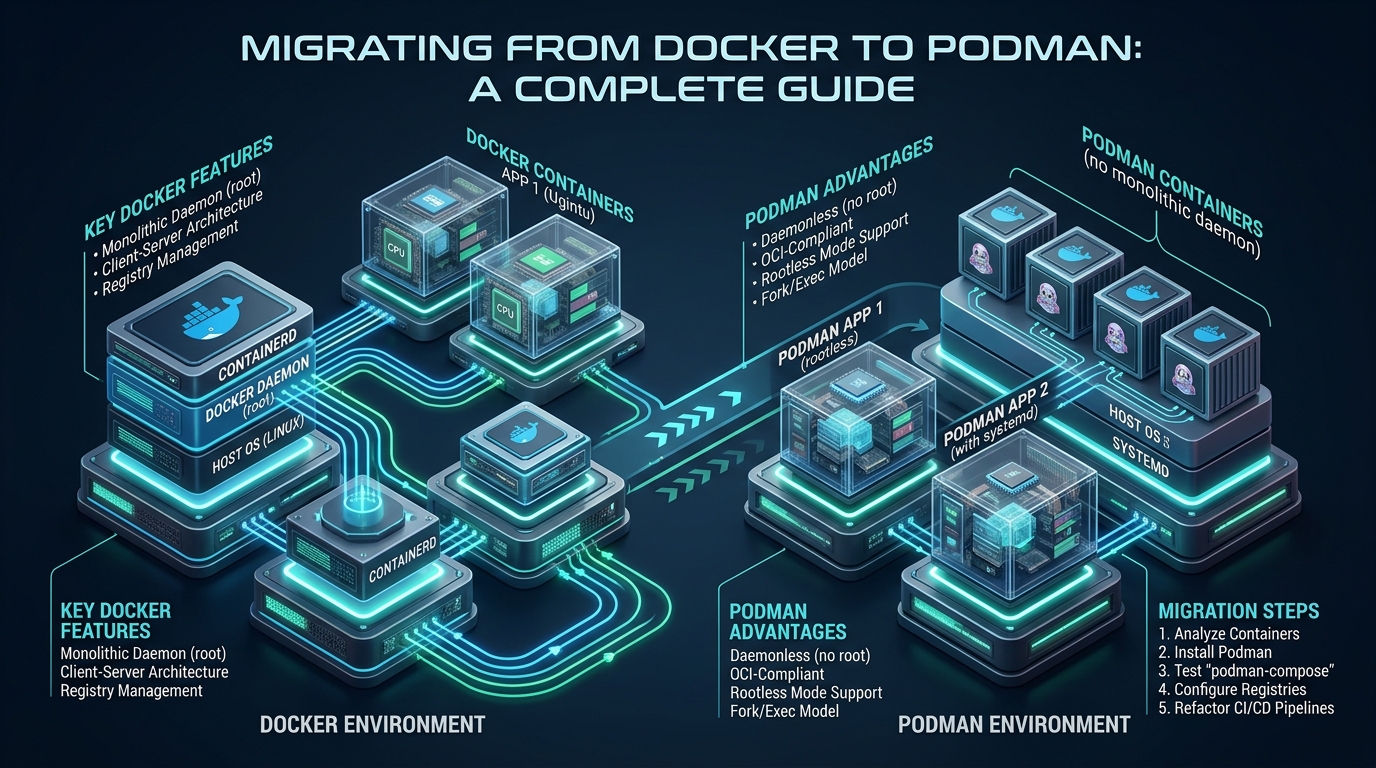
For high-density production environments, running containers through a monolithic root-level background daemon introduces a persistent single point of failure (SPOF) and an unnecessary privilege escalation vector across the host operating system. Transitioning container workloads to Podman fundamentally mitigates this vulnerability by eliminating the central daemon in favor of the traditional Linux fork/exec process model and user namespaces. Whether you are provisioning experimental development environments on CpanelFree or hardening enterprise infrastructure for multi-tenant production, mastering the migration from Docker to Podman provides uncompromised security, superior resource accounting, and native init integration without breaking familiar container management syntax.
What is the Core Difference Between Docker and Podman?
Quick Answer: Migrating from Docker to Podman replaces Docker’s centralized root daemon with a daemonless, rootless architecture leveraging standard Linux fork/exec processes. Podman runs containers under user namespaces, integrates natively with systemd through Quadlets, eliminates root security vulnerabilities, and provides drop-in command-line parity with existing Docker environments.
To understand why enterprise Linux environments are aggressively migrating toward Podman, systems architects must examine the underlying process execution models. Docker relies on a client-server architecture: the docker command-line interface communicates across a UNIX domain socket (/var/run/docker.sock) with dockerd, a centralized root daemon. The daemon communicates with containerd, which then invokes runc via temporary shims to spawn containers. If dockerd crashes or becomes unresponsive during a heavy I/O storm, the control plane freezes, and diagnosing individual container processes becomes decoupled from the operating system’s native process tree.
Conversely, Podman (Pod Manager) completely discards the background daemon. When a sysadmin invokes podman run, Podman directly executes the OCI-compliant runtime (such as crun or runc) under a lightweight monitoring process named conmon (Container Monitor). Each container exists as a direct child process of the invoking user or service supervisor. Because there is no persistent root socket listening for remote API instructions, Podman removes the entire attack surface associated with unauthorized Docker socket mounts.
Architectural Benchmark: Docker Engine vs. Podman OCI Architecture
When planning a docker to podman migration, operational teams must evaluate architectural trade-offs across security, init supervision, resource consumption, and container networking. The comparative matrix below details the mechanical differences between traditional Docker Engine defaults and tuned Podman production environments.
| Architectural Dimension | Docker Engine (Standard) | Podman (Tuned Production) |
|---|---|---|
| Daemon Architecture | Monolithic background daemon (dockerd) |
Daemonless direct fork/exec model |
| Privilege Boundary | Requires root daemon or docker group (sudo equivalent) | Rootless by default via user namespaces |
| Process Lifecycle & Supervision | Internal daemon shims; decoupled from host init | Native Linux systemd cgroup v2 slices & Quadlets |
| Boot Restart Strategy | restart: always managed by daemon |
Declarative systemd unit targets (Restart=always) |
| Container Networking | Default bridge (docker0) altering iptables |
Netavark + Aardvark-DNS (High performance stack) |
| Multi-Container Primitives | External Docker Compose binary dependencies | Native Kubernetes Pod definitions & Quadlets |
| Idle Memory Overhead | 120MB – 350MB persistent resident daemon RAM | 0 MB when idle; zero persistent daemon footprint |
Step 1: Preparing Linux User Namespaces and Kernel Parameters
The foundation of Podman’s rootless security architecture is the Linux user namespace (user_namespaces(7)). Under rootless operation, your standard non-root user (e.g., UID 1000) maps to UID 0 inside the container. If an attacker discovers a remote code execution vulnerability inside your container and achieves a container breakout, they land on the host system as UID 1000, possessing zero access to /root, raw block devices, or kernel modules.
To enable rootless container execution, the host kernel must support user namespaces, and subordinate user IDs (subuid) and group IDs (subgid) must be allocated. Additionally, enterprise workloads listening on privileged ports (ports 80 and 443) require tuning net.ipv4.ip_unprivileged_port_start.
Create the following kernel sysctl configuration file to prepare your production server:
# /etc/sysctl.d/99-podman-production.conf
# Enable unprivileged port binding down to port 80 for web services
net.ipv4.ip_unprivileged_port_start = 80

# Increase maximum user namespaces for high-density container hosts
user.max_user_namespaces = 28633

# Optimize virtual memory max map count for databases and Java/Node workloads
vm.max_map_count = 262144

# Expand inotify instance limits for container file watchers
fs.inotify.max_user_instances = 8192
fs.inotify.max_user_watches = 524288
Apply these kernel parameters immediately without rebooting:
sudo sysctl --systemNext, ensure your application deployment user (for example, deployer) has a designated subuid and subgid range. Inspect /etc/subuid and /etc/subgid:
# /etc/subuid and /etc/subgid configuration entry
# format: username:starting_subuid:range_size
deployer:100000:65536
If these entries do not exist, generate them using usermod:
sudo usermod --add-subuids 100000-165535 deployer
sudo usermod --add-subgids 100000-165535 deployer
Architecture Note: In production environments where container services run under an unprivileged user, systemd terminates user processes when the SSH session closes. To ensure rootless containers persist through user logouts and start automatically upon system boot, you must enable systemd user lingering with
loginctl enable-linger deployer.
Step 2: Configuring Registries and Short-Name Security
Unlike Docker Engine, which defaults unconditionally to docker.io (Docker Hub) when resolving unqualified image names (such as nginx:alpine), Podman prioritizes registry security. If an unqualified image name is passed without a registry prefix, Podman queries a preconfigured list or prompts the operator to prevent supply-chain image poisoning.
Configure the global container registries file to ensure predictable, secure automated pulls in production pipelines:
# /etc/containers/registries.conf
# Global container registry configuration

[registries.search]
registries = ['docker.io', 'quay.io', 'ghcr.io']

[registries.insecure]
registries = []

[registries.block]
registries = []

# Optional enterprise mirror configuration
[[registry]]
prefix = "docker.io"
location = "docker.io"

[[registry.mirror]]
location = "mirror.gcr.io"
insecure = false
For fully automated CI/CD environments where interactive prompts cause build script failures, enforce strict short-name resolution in /etc/containers/registries.conf.d/00-shortnames.conf or always specify the fully qualified domain name (FQDN), such as docker.io/library/nginx:alpine.
Step 3: CLI Aliases and the Docker API Socket Emulation
Because Podman was intentionally engineered as a drop-in replacement for Docker, nearly 99% of standard CLI flags—including run, ps, exec, logs, build, images, and network—behave identically. You can configure shell aliases immediately:
# Add to ~/.bashrc or ~/.zshrc
alias docker=podman
alias docker-compose='podman-compose'
However, modern DevOps stacks frequently rely on third-party tools (such as Testcontainers, Terraform Docker providers, Portainer, or VS Code Dev Containers) that communicate directly with the Docker UNIX socket. Podman provides a complete REST API service that is 100% wire-compatible with the Docker Engine API.
To enable the rootless Docker API compatibility socket for your unprivileged deployment user, execute:
# Enable and start the user-level Podman API socket
systemctl --user enable --now podman.socket

# Verify the socket location
systemctl --user status podman.socket

# Export the DOCKER_HOST environment variable
export DOCKER_HOST="unix://$XDG_RUNTIME_DIR/podman/podman.sock"
echo 'export DOCKER_HOST="unix://$XDG_RUNTIME_DIR/podman/podman.sock"' >> ~/.bashrc

# Test API compatibility using native docker CLI or curl
curl --unix-socket "$XDG_RUNTIME_DIR/podman/podman.sock" http://d/v1.41/version
Step 4: Replacing docker-compose with Native Systemd Quadlets
While tools like podman-compose and docker-compose work with Podman, the enterprise gold standard for orchestrating containerized services on Linux is Systemd Quadlets. Introduced in modern Podman versions, Quadlets allow you to define containers using native, declarative systemd unit syntax.
Quadlet files reside in ~/.config/containers/systemd/ (for rootless users) or /etc/containers/systemd/ (system-wide). Systemd automatically parses these declarative files into standard .service units during daemon-reload, providing battle-tested watchdog restarts, automatic journald log rotation, cgroup resource constraints, and precise dependency ordering (e.g., waiting for PostgreSQL to be healthy before starting Nginx).
Here is a complete, production-grade systemd Quadlet container definition for a web service stack with health monitoring and automatic restarts:
# ~/.config/containers/systemd/production-web.container
[Unit]
Description=Production Nginx Edge Container
After=network-online.target local-fs.target
Wants=network-online.target

[Container]
Image=docker.io/library/nginx:1.27-alpine
ContainerName=production-web
PublishPort=80:80
PublishPort=443:443
Volume=%h/apps/web/html:/usr/share/nginx/html:ro,Z
Volume=%h/apps/web/nginx.conf:/etc/nginx/nginx.conf:ro,Z
Network=host
Environment=TZ=UTC
HealthCmd=curl -f http://localhost:80/ || exit 1
HealthInterval=30s
HealthRetries=3
HealthTimeout=5s

[Service]
Restart=on-failure
RestartSec=10s
TimeoutStartSec=300
Slice=app.slice

[Install]
WantedBy=default.target
To compile and activate this Quadlet container, run the following commands:
# Instruct systemd to parse the Quadlet definition
systemctl --user daemon-reload

# Start the newly generated service
systemctl --user start production-web.service

# Verify the container status and inspect live logs
systemctl --user status production-web.service
journalctl --user -u production-web.service -f
Architecture Note: Unlike Docker Compose, which requires custom scripts or cron jobs to restart containers after an unexpected host crash, systemd Quadlets leverage the Linux kernel’s native init system. If the container process is terminated by the OOM killer or crashes, systemd immediately enforces the configured
Restart=on-failurepolicy without needing any external orchestrator.
Step 5: Managing Persistent Storage, SELinux, and podman unshare
Storage management is where engineers encountering a docker to podman migration most frequently face permission errors. In Docker, volume mounts are owned by root:root on the host system because the daemon runs as root. In rootless Podman, volume ownership on the host matches the unprivileged user’s UID.
When container applications (such as MySQL, Redis, or Nginx) drop privileges internally to UID 999 or UID 101, rootless Podman shifts those IDs into the allocated subuid range. To inspect and adjust file ownership inside the container’s user namespace without becoming root on the host, use podman unshare:
# Enter the user namespace shell as the container root user
podman unshare

# Inside the namespace: permissions correspond to mapped container IDs
chown -R 101:101 /home/deployer/apps/web/html
chmod 755 /home/deployer/apps/web/html
exit
Furthermore, on Red Hat Enterprise Linux, Rocky Linux, AlmaLinux, and Fedora, SELinux is enforced by default. If you mount a host directory into a container without adjusting the security context, the container will encounter permission denied errors (EACCES). Podman handles this elegantly via volume mount flags:
:z(shared context): Appends a shared SELinux container label (container_file_t) allowing multiple containers to read and write to the directory.:Z(private unshared context): Appends a private, unique SELinux container label, ensuring only this specific container instance can access the data directory.
Production Best Practices for Enterprise Container Hosting
To achieve high-availability and rock-solid stability when deploying containerized applications, your underlying compute infrastructure must provide guaranteed I/O performance and unmetered network bandwidth. Low-latency storage is critical because container layer extraction (using the OverlayFS driver) and database write-ahead logs (WAL) quickly bottleneck on shared spinning disks or throttled virtual block volumes.
When moving from local staging to mission-critical production hosting, running containerized workloads on MeraHost Enterprise Cloud ensures maximum throughput with pure Enterprise NVMe storage arrays, LiteSpeed Web Server acceleration, and a predictable, transparent infrastructure budget backed by their Same Renewal Price, Always guarantee.
Frequently Asked Questions (FAQ)
Can I use my existing Dockerfiles and container images with Podman?
Yes. Both Docker and Podman adhere strictly to the Open Container Initiative (OCI) image and runtime specifications. Any standard Dockerfile, OCI container image, or multi-stage build configuration can be built directly using podman build without any modifications to your source code.
How does Podman handle port binding below 1024 in rootless mode?
By default, the Linux kernel restricts binding to ports below 1024 to the root user. With Podman, you can tune the sysctl parameter net.ipv4.ip_unprivileged_port_start = 80 in /etc/sysctl.d/99-podman-production.conf. This allows rootless users to bind directly to standard HTTP (80) and HTTPS (443) ports without requiring root privileges or setuid binaries.
What happens to rootless containers when a user logs out of the server?
By default, systemd terminates unprivileged user processes upon session termination. To prevent your containers from shutting down when you disconnect from an SSH session, you must enable systemd user lingering using the command loginctl enable-linger <username>. This ensures the user’s systemd manager starts at system boot and remains active across logouts.
Is Podman Compose fully compatible with Docker Compose v2?
Most standard Docker Compose files run seamlessly using podman-compose or by executing the official docker compose CLI against the Podman UNIX compatibility socket (podman.socket). However, for mission-critical enterprise production deployments, migrating from compose files to native Systemd Quadlets is strongly recommended for superior init supervision and process isolation.
Deploy Enterprise-Grade Production Infrastructure
Need guaranteed performance with zero price hikes? Host mission-critical workloads on MeraHost with pure Enterprise NVMe, LiteSpeed Web Server, and Same Renewal Price, Always (starting at ₹99/mo).