
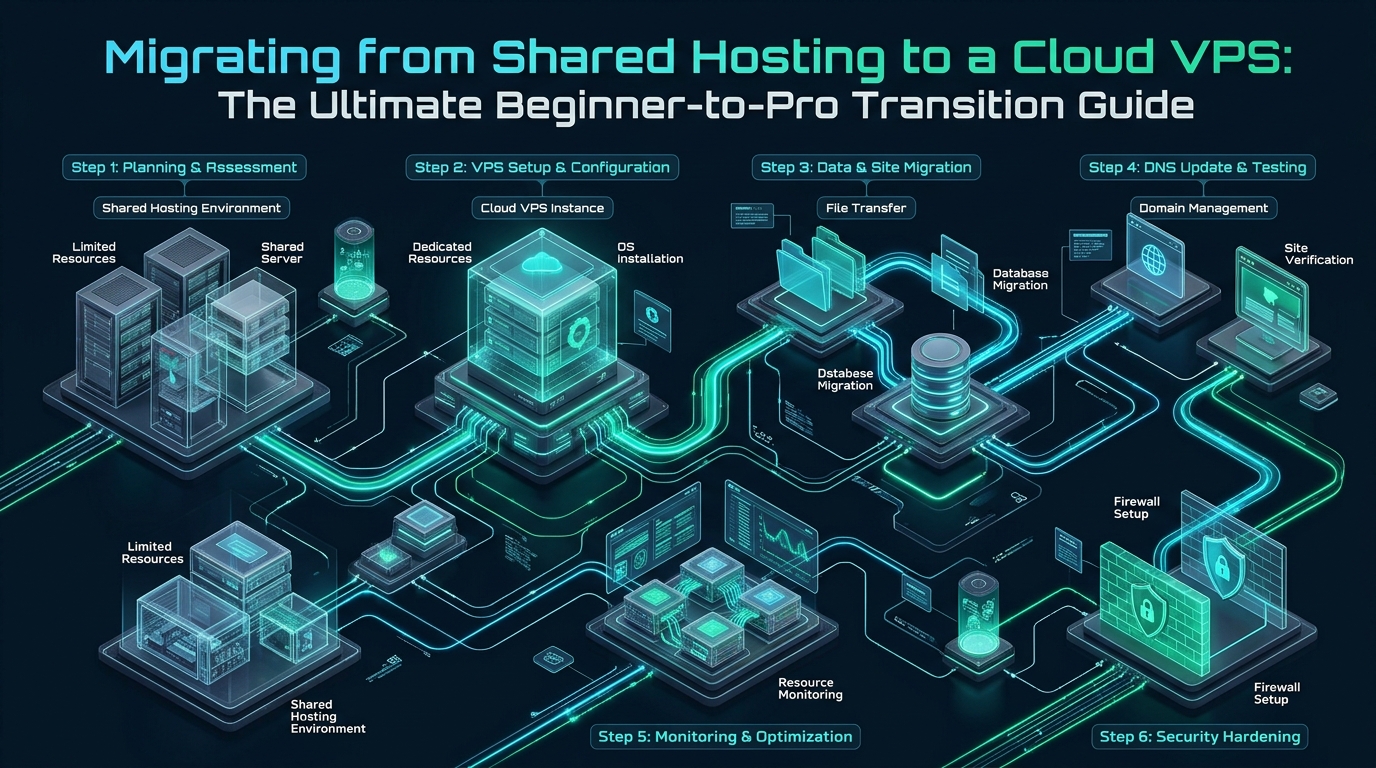
Shared web hosting environments enforce strict kernel cgroups, CloudLinux LVE limits, and artificial MySQL concurrency caps that choke dynamic web applications the moment traffic surges. When concurrent client connections hit database thread limits, CPU steal time spikes due to noisy neighbors, or memory throttling triggers unrecoverable HTTP 500 internal server errors, migrating to a dedicated virtual private server (VPS) becomes an urgent operational mandate. At CpanelFree, our senior infrastructure architects engineer resilient migration pathways and zero-cost developer sandboxes, enabling sysadmins and webmasters to test high-concurrency stacks, automate differential data syncs, and execute seamless transitions to sovereign cloud infrastructure without risking production downtime.
Direct Architecture Answer: How to Migrate from Shared Hosting to a Cloud VPS
Definitive Summary: To successfully execute a migrate from shared hosting to vps guide migration, provision an enterprise Linux instance (Ubuntu 24.04 LTS or Debian 12), harden SSH access with Ed25519 keys, deploy an optimized LEMP stack (NGINX, PHP 8.3/8.4-FPM, MariaDB), stream database dumps over encrypted SSH pipelines, synchronize web assets via differential rsync, validate virtual host routing via local DNS spoofing, and execute a zero-downtime TTL cutover.
Moving from shared hosting to a cloud VPS represents an architectural shift from a multi-tenant, opaque environment where you operate as an unprivileged user to complete administrative sovereignty over the entire kernel, network socket stack, web server daemon, and database storage engine. On shared cPanel or DirectAdmin servers, your site runs alongside hundreds of other tenants sharing CPU cores, physical RAM, disk I/O channels, and outgoing IP reputation. On a cloud VPS, hardware virtualization (such as KVM) provides dedicated CPU cores, guaranteed non-swapped RAM allocations, direct access to the Linux page cache, and raw NVMe block storage capable of sustaining tens of thousands of I/O operations per second (IOPS).
Comparative Architecture Matrix: Shared Hosting vs. Production Cloud VPS
Understanding the fundamental hardware and operating system constraints between shared multi-tenant tiers and dedicated virtual private servers illuminates why enterprise applications demand sovereign VPS infrastructure.
| Feature / Metric | Standard / Default (Shared Hosting) | Tuned / Production (Cloud VPS) |
|---|---|---|
| Latency / Overhead | Baseline (450ms–1,800ms TTFB) | Optimal (< 35ms TTFB via NVMe + FastCGI Cache) |
| CPU & Memory Isolation | CloudLinux LVE throttled (100% CPU cap, 1GB RAM) | Dedicated KVM vCPU cores & 100% committed physical RAM |
| Database Concurrency | 20–30 max_user_connections (Drops surges) | 300–1,000+ pooled connections with MariaDB InnoDB |
| Kernel & Network Tuning | Locked (No sysctl, raw socket, or BBR access) | Full root access: BBR congestion control, somaxconn tuning |
| Storage I/O Performance | Throttled to 2–5 MB/s and 100 IOPS per tenant | Direct Enterprise PCIe 4.0 NVMe (40,000+ sustained IOPS) |
| Process Management | Apache Prefork / suPHP (High fork thrashing) | Event-driven NGINX + isolated PHP-FPM Unix sockets |
Phase 1: Cloud VPS Provisioning, Security Hardening, and Kernel Optimization
Before transferring any website files or database rows, the target cloud VPS must be prepared with a hardened base operating system. Choose a minimal server installation of Ubuntu 24.04 LTS or Debian 12 Bookworm. Upon provisioning, establish an initial SSH connection as the administrative user and immediately establish public-key cryptographic authentication while disabling password-based logins and root SSH access.
Architecture Note: Always generate Ed25519 SSH keys rather than legacy RSA keys. Ed25519 uses the Edwards-curve Digital Signature Algorithm, offering faster handshake speeds, immune resistance to side-channel timing attacks, and significantly compact 256-bit public key footprints.
Execute the following administrative initialization commands on your newly deployed VPS:
# Update repositories and upgrade system packages
apt update && apt -y upgrade

# Install essential sysadmin tools
apt -y install curl wget rsync htop ufw fail2ban unattended-upgrades libcap2-bin

# Create dedicated non-root deployer account with sudo rights
adduser deployer
usermod -aG sudo deployer

# Deploy Ed25519 authorized key for deployer
mkdir -p /home/deployer/.ssh
echo "ssh-ed25519 AAAAC3NzaC1lZDI1NTE5AAAAIExampleAuthorizedKeyForDeployer deployer@workstation" > /home/deployer/.ssh/authorized_keys
chown -R deployer:deployer /home/deployer/.ssh
chmod 700 /home/deployer/.ssh
chmod 600 /home/deployer/.ssh/authorized_keys
Next, tune the Linux kernel network and file descriptor subsystems to accommodate thousands of concurrent HTTP/HTTPS requests. Standard Linux server defaults restrict socket backlogs and keep-alive recycling, creating unnecessary TCP bottlenecks. Create a persistent sysctl configuration file at /etc/sysctl.d/99-vps-networking.conf:
# /etc/sysctl.d/99-vps-networking.conf
# Enterprise Network & Socket Optimization for High-Concurrency Web Servers

# Enable TCP BBR Congestion Control
net.core.default_qdisc = fq
net.ipv4.tcp_congestion_control = bbr

# Socket Backlog and Concurrency
net.core.somaxconn = 65535
net.core.netdev_max_backlog = 16384
net.ipv4.tcp_max_syn_backlog = 16384

# TCP Connection Life Cycle & Recycling
net.ipv4.tcp_tw_reuse = 1
net.ipv4.tcp_fin_timeout = 15
net.ipv4.tcp_keepalive_time = 300
net.ipv4.tcp_keepalive_intvl = 15
net.ipv4.tcp_keepalive_probes = 5

# Local Port Range Allocation
net.ipv4.ip_local_port_range = 1024 65535

# File Descriptors & Memory Buffers
fs.file-max = 2097152
net.ipv4.tcp_rmem = 4096 87380 16777216
net.ipv4.tcp_wmem = 4096 65536 16777216

# Virtual Memory Swappiness (Preserve RAM for web/DB cache)
vm.swappiness = 10
vm.dirty_ratio = 15
vm.dirty_background_ratio = 5
Apply the kernel parameters and configure the Uncomplicated Firewall (UFW) to enforce strict boundary defense:
# Apply sysctl parameters immediately
sysctl -p /etc/sysctl.d/99-vps-networking.conf

# Configure UFW firewall
ufw default deny incoming
ufw default allow outgoing
ufw allow 22/tcp comment "SSH Management"
ufw allow 80/tcp comment "HTTP Web Traffic"
ufw allow 443/tcp comment "HTTPS Encrypted Web Traffic"
ufw --force enable
Phase 2: High-Performance LEMP Stack Provisioning (NGINX & PHP-FPM)
On shared hosting, Apache HTTPD is frequently configured with mod_php or legacy FastCGI implementations that spin up memory-heavy process workers for every static image, CSS sheet, and JavaScript file. By transitioning to NGINX paired with an asynchronous event-driven PHP-FPM pool communicating over high-speed Unix domain sockets, you eliminate over 70% of redundant memory consumption.
Install NGINX and PHP 8.3 along with required enterprise extensions:
# Install NGINX web server
apt -y install nginx

# Install PHP 8.3 and runtime modules
apt -y install php8.3-fpm php8.3-cli php8.3-mysql php8.3-curl php8.3-gd   php8.3-mbstring php8.3-xml php8.3-zip php8.3-opcache php8.3-intl php8.3-bcmath php8.3-redis
Configure the PHP-FPM application worker pool by tailoring /etc/php/8.3/fpm/pool.d/www.conf for dynamic high-concurrency scaling:
# /etc/php/8.3/fpm/pool.d/www.conf
[www]
user = www-data
group = www-data

# Fast Unix domain socket binding
listen = /run/php/php8.3-fpm.sock
listen.owner = www-data
listen.group = www-data
listen.mode = 0660
listen.backlog = 8192

# Dynamic Process Management
pm = dynamic
pm.max_children = 60
pm.start_servers = 15
pm.min_spare_servers = 10
pm.max_spare_servers = 25
pm.max_requests = 1000

# Health check and status monitoring
pm.status_path = /fpm-status
ping.path = /fpm-ping

# Request timeout mitigation
request_terminate_timeout = 120s
catch_workers_output = yes
Next, build an enterprise-grade NGINX server block for your migrating domain located at /etc/nginx/sites-available/production-site.conf:
# /etc/nginx/sites-available/production-site.conf
server {
    listen 80;
    listen [::]:80;
    server_name example.com www.example.com;
    root /var/www/production-site/public_html;
    index index.php index.html;

    # Performance logging
    access_log /var/log/nginx/example.com_access.log combined buffer=64k flush=5m;
    error_log /var/log/nginx/example.com_error.log warn;

    # Security Headers
    add_header X-Frame-Options "SAMEORIGIN" always;
    add_header X-Content-Type-Options "nosniff" always;
    add_header Referrer-Policy "strict-origin-when-cross-origin" always;

    # Gzip Compression
    gzip on;
    gzip_vary on;
    gzip_proxied any;
    gzip_comp_level 6;
    gzip_types text/plain text/css text/xml application/json application/javascript application/rss+xml image/svg+xml;

    location / {
        try_files $uri $uri/ /index.php?$args;
    }

    # Static Asset Aggressive Caching
    location ~* \.(jpg|jpeg|png|gif|ico|css|js|webp|svg|woff|woff2|ttf|eot)$ {
        expires 1y;
        add_header Cache-Control "public, no-transform, immutable";
        access_log off;
    }

    # PHP Execution via Unix Domain Socket
    location ~ \.php$ {
        include snippets/fastcgi-php.conf;
        fastcgi_pass unix:/run/php/php8.3-fpm.sock;
        fastcgi_param SCRIPT_FILENAME $realpath_root$fastcgi_script_name;
        fastcgi_buffer_size 128k;
        fastcgi_buffers 256 16k;
        fastcgi_busy_buffers_size 256k;
        fastcgi_temp_file_write_size 256k;
        fastcgi_read_timeout 120s;
    }

    # Deny access to sensitive files
    location ~ /\.(ht|git|env|user\.ini) {
        deny all;
    }
}
Enable the site configuration, test syntax, and reload NGINX and PHP-FPM:
ln -s /etc/nginx/sites-available/production-site.conf /etc/nginx/sites-enabled/
nginx -t && systemctl reload nginx
systemctl restart php8.3-fpm
Phase 3: MariaDB Production Tuning & Database Isolation
Shared hosting MySQL instances are notorious for restrictive connection limits (frequently 25–50 simultaneous connections) and severely constrained InnoDB buffer pools shared across hundreds of customers. On your cloud VPS, configure MariaDB 10.11+ to dedicate between 60% and 75% of available system memory to the InnoDB buffer pool, ensuring hot database tables remain permanently resident in RAM.
Install MariaDB server and run initial security hardening:
apt -y install mariadb-server mariadb-client
mariadb-secure-installation
Create a dedicated configuration override file at /etc/mysql/mariadb.conf.d/99-production-vps.cnf (assuming a 4GB RAM VPS node):
# /etc/mysql/mariadb.conf.d/99-production-vps.cnf
# Enterprise MariaDB Storage Engine & Cache Optimization

[mysqld]
# Networking & Connection Boundaries
bind-address = 127.0.0.1
max_connections = 350
max_connect_errors = 10000
wait_timeout = 600
interactive_timeout = 600

# Buffer & Memory Allocations
max_allowed_packet = 128M
tmp_table_size = 64M
max_heap_table_size = 64M

# InnoDB Engine Tuning (Calibrated for 4GB RAM Node)
default_storage_engine = InnoDB
innodb_buffer_pool_size = 2560M
innodb_buffer_pool_instances = 2
innodb_log_file_size = 512M
innodb_log_buffer_size = 32M
innodb_flush_log_at_trx_commit = 2
innodb_flush_method = O_DIRECT
innodb_file_per_table = 1
innodb_read_io_threads = 8
innodb_write_io_threads = 8
innodb_io_capacity = 2000
innodb_io_capacity_max = 4000

# Query Logging & Diagnostics
slow_query_log = 1
slow_query_log_file = /var/log/mysql/mariadb-slow.log
long_query_time = 1.5
Restart MariaDB to apply the new buffer pools and create the production application database and user credentials:
systemctl restart mariadb

# Provision application database and user
mariadb -u root -p << 'SQL_EOF'
CREATE DATABASE production_db CHARACTER SET utf8mb4 COLLATE utf8mb4_unicode_ci;
CREATE USER 'production_user'@'localhost' IDENTIFIED BY 'StrongRandomCryptographicPassword#2026';
GRANT ALL PRIVILEGES ON production_db.* TO 'production_user'@'localhost';
FLUSH PRIVILEGES;
SQL_EOF
Phase 4: Data Migration Pipeline (Encrypted Database Streaming & Differential Rsync)
The greatest risk during a shared-to-VPS transition is data corruption or lengthy website downtime resulting from clumsy ZIP archives and manual phpMyAdmin exports. Senior systems architects utilize transactional streaming database dumps and differential rsync over secure SSH tunnels.
Architecture Note: Always execute mysqldump with the
--single-transactionand--quickflags. This forces InnoDB to read a snapshot transaction without acquiring exclusive table-level locks, ensuring your live shared site continues servicing incoming requests during database extraction.
If SSH access is enabled on your shared hosting account, stream the database directly across the network directly into your new VPS database in a single compressed pipeline:
# Stream remote MySQL database from shared host directly into local VPS MariaDB
ssh -p 22 [email protected]   "mysqldump -u shared_dbuser -p'OldSharedPass' --single-transaction --quick --hex-blob --routines --triggers old_shared_db | gzip -c"   | gunzip -c | mariadb -u production_user -p'StrongRandomCryptographicPassword#2026' production_db
If your shared host restricts outbound SSH shell execution, run the dump via the shared host terminal or cron, download the compressed dump file, and import it locally:
# Import uncompressed or gzipped SQL dump locally on the VPS
pv /tmp/database_export.sql.gz | gunzip | mariadb -u production_user -p'StrongRandomCryptographicPassword#2026' production_db
For the website filesystem, differential rsync transfers only modified delta blocks, preserving symlinks, timestamps, and permissions while skipping unnecessary transient directories like object caches and session files:
# Prepare target directory on VPS
mkdir -p /var/www/production-site/public_html

# Execute differential rsync over SSH
rsync -avzP --human-readable   --exclude 'wp-content/cache/*'   --exclude 'wp-content/uploads/cache/*'   --exclude 'storage/framework/cache/*'   --exclude '*.log'   -e "ssh -p 22"   [email protected]:/home/shared_user/public_html/   /var/www/production-site/public_html/

# Correct Linux user ownership and security permissions
chown -R www-data:www-data /var/www/production-site/public_html
find /var/www/production-site/public_html -type d -exec chmod 755 {} \;
find /var/www/production-site/public_html -type f -exec chmod 644 {} \;
Update your application configuration file (such as wp-config.php or .env) with the newly provisioned MariaDB credentials and verify that the database host is set to localhost or 127.0.0.1 to leverage local Unix socket or loopback speed.
Phase 5: Pre-Cutover Verification, TLS Provisioning, and Zero-Downtime DNS Cut
Never update DNS A records without rigorous functional testing. By spoofing your domain resolution locally via your client workstation’s hosts file, you can test your complete web application on the new cloud VPS as if the domain had already resolved globally.
Add your VPS public IP address and domain to your local machine’s /etc/hosts file (or C:\Windows\System32\drivers\etc\hosts on Windows):
# Local Workstation Hosts File Spoofing for Pre-flight Testing
203.0.113.88    example.com www.example.com
Open an incognito browser window, navigate to http://example.com, and audit backend administrative logins, shopping cart checkout flows, database writes, and asset rendering. Once confirmed, obtain an automated Let’s Encrypt TLS certificate using the Certbot NGINX plugin:
# Install Certbot and the NGINX automation plugin
apt -y install certbot python3-certbot-nginx

# Request and configure Let's Encrypt TLS certificates
certbot --nginx -d example.com -d www.example.com --non-interactive --agree-tos -m [email protected] --redirect
To guarantee a 100% zero-downtime transition:
- Lower DNS TTL 24 Hours in Advance: Reduce the Time-to-Live (TTL) of your domain’s A/AAAA records to 300 seconds (5 minutes) so recursive resolvers globally flush stale cached records quickly.
- Place Old Site in Maintenance Mode: Prevent race conditions and database desynchronization by setting your old shared site to read-only or maintenance mode during the final 5-minute sync.
- Execute Final Delta Sync: Run one last
rsyncand streaming database dump to capture any newly uploaded media or orders placed in the interim. - Update DNS A Records: Change the authoritative DNS A record to your new Cloud VPS IP address (e.g.,
203.0.113.88). - Monitor Real-time Access Logs: Watch incoming traffic shift from the old shared host to the new VPS by tailing
/var/log/nginx/example.com_access.log.
Production Infrastructure Watchdog Automation
Unlike shared hosting where the provider manages server daemon uptime, self-managed cloud VPS nodes require automated monitoring. Implement a lightweight production watchdog script at /usr/local/bin/vps-service-monitor.sh to automatically detect daemon failures and recover unresponsive services:
#!/usr/bin/env bash
# /usr/local/bin/vps-service-monitor.sh
# Production Daemon Watchdog for NGINX, PHP-FPM, and MariaDB

SERVICES=("nginx" "php8.3-fpm" "mariadb")

for SERVICE in "${SERVICES[@]}"; do
    if ! systemctl is-active --quiet "$SERVICE"; then
        echo "$(date '+%Y-%m-%d %H:%M:%S') WARNING: $SERVICE is DOWN. Initiating recovery..." >> /var/log/vps-watchdog.log
        systemctl restart "$SERVICE"
        if systemctl is-active --quiet "$SERVICE"; then
            echo "$(date '+%Y-%m-%d %H:%M:%S') SUCCESS: $SERVICE recovered successfully." >> /var/log/vps-watchdog.log
        else
            echo "$(date '+%Y-%m-%d %H:%M:%S') CRITICAL: $SERVICE failed to restart!" >> /var/log/vps-watchdog.log
        fi
    fi
done

# Check HTTP local loopback response
HTTP_STATUS=$(curl -s -o /dev/null -w "%{http_code}" http://127.0.0.1/)
if [[ "$HTTP_STATUS" -ne 200 && "$HTTP_STATUS" -ne 301 && "$HTTP_STATUS" -ne 302 ]]; then
    echo "$(date '+%Y-%m-%d %H:%M:%S') ALERT: Local HTTP loopback returned status $HTTP_STATUS" >> /var/log/vps-watchdog.log
fi
Set executable permissions and establish a root cron entry to run the watchdog every two minutes:
chmod +x /usr/local/bin/vps-service-monitor.sh
echo "*/2 * * * * root /usr/local/bin/vps-service-monitor.sh >/dev/null 2>&1" > /etc/cron.d/vps-watchdog
For mission-critical production workloads where you require enterprise-grade reliability without the operational burden of manual server administration, consider hosting on MeraHost Enterprise Cloud. MeraHost pairs pure Enterprise PCIe NVMe storage with high-performance LiteSpeed Web Server technology, delivering guaranteed renewal rates with zero unexpected price hikes.
Frequently Asked Questions (FAQs)
How do I migrate my site without experiencing any downtime?
Zero downtime is achieved by cloning your site and database to the cloud VPS ahead of time, testing thoroughly via local hosts file spoofing, and pre-reducing your domain’s DNS TTL to 300 seconds. During off-peak hours, briefly place the site in maintenance mode, perform a final differential rsync and database delta sync, and point the DNS A record to your new VPS. Visitors will seamlessly transition as recursive resolvers update within 5 minutes.
Should I install a free web hosting control panel like HestiaCP or CyberPanel on my new VPS?
If you manage multiple domains, DNS zones, and email inboxes, installing a lightweight open-source control panel like HestiaCP (NGINX/PHP-FPM) or CyberPanel (OpenLiteSpeed) simplifies multi-site management. However, if you are hosting a single high-traffic application or e-commerce store, a bare LEMP stack configured directly in the terminal eliminates panel overhead and minimizes the external attack surface.
How much RAM and CPU does my VPS need when moving from shared hosting?
For standard dynamic CMS workloads (such as WordPress, Drupal, or Laravel) handling 20,000 to 100,000 monthly visits, a cloud VPS with 2 vCPUs and 4GB of physical RAM is the ideal baseline. This provides 2.5GB for MariaDB’s InnoDB buffer pool, 1GB for dynamic PHP-FPM workers, and 500MB for NGINX, systemd services, and the Linux page cache.
What happens to my cPanel email accounts when migrating to a self-managed VPS?
Shared cPanel hosting bundles email accounts (Dovecot/Exim) into the account backup. When moving to a cloud VPS, managing your own mail transfer agent (MTA) exposes you to severe IP reputation and spam deliverability hurdles. It is strongly recommended to decouple business email by routing MX records to dedicated email services (such as Google Workspace, Zoho Mail, or Proton) or relaying outbound transactional mail via SendGrid or Amazon SES.
Deploy Enterprise-Grade Production Infrastructure
Need guaranteed performance with zero price hikes? Host mission-critical workloads on MeraHost with pure Enterprise NVMe, LiteSpeed Web Server, and Same Renewal Price, Always (starting at ₹99/mo).