Exposing standard administrative endpoints—such as TCP port 22 for SSH or custom TLS ports like 2087 and 9090 for web management consoles—directly to the public internet invites constant automated reconnaissance, dictionary attacks, and zero-day remote exploit payloads. Traditional perimeter mitigation strategies like fail2ban, non-standard listening ports, and strict IP allowlists frequently break down across dynamic developer environments and distributed teams. Whether you are orchestrating transient developer nodes on CpanelFree or hardening bare-metal cloud infrastructure, replacing public-facing listening sockets with an egress-only Cloudflare Tunnel (cloudflared) fundamentally neutralizes perimeter threats by moving edge authentication to Cloudflare Zero Trust.
What Is a Cloudflare Tunnel and How Does It Eliminate Open Ports?
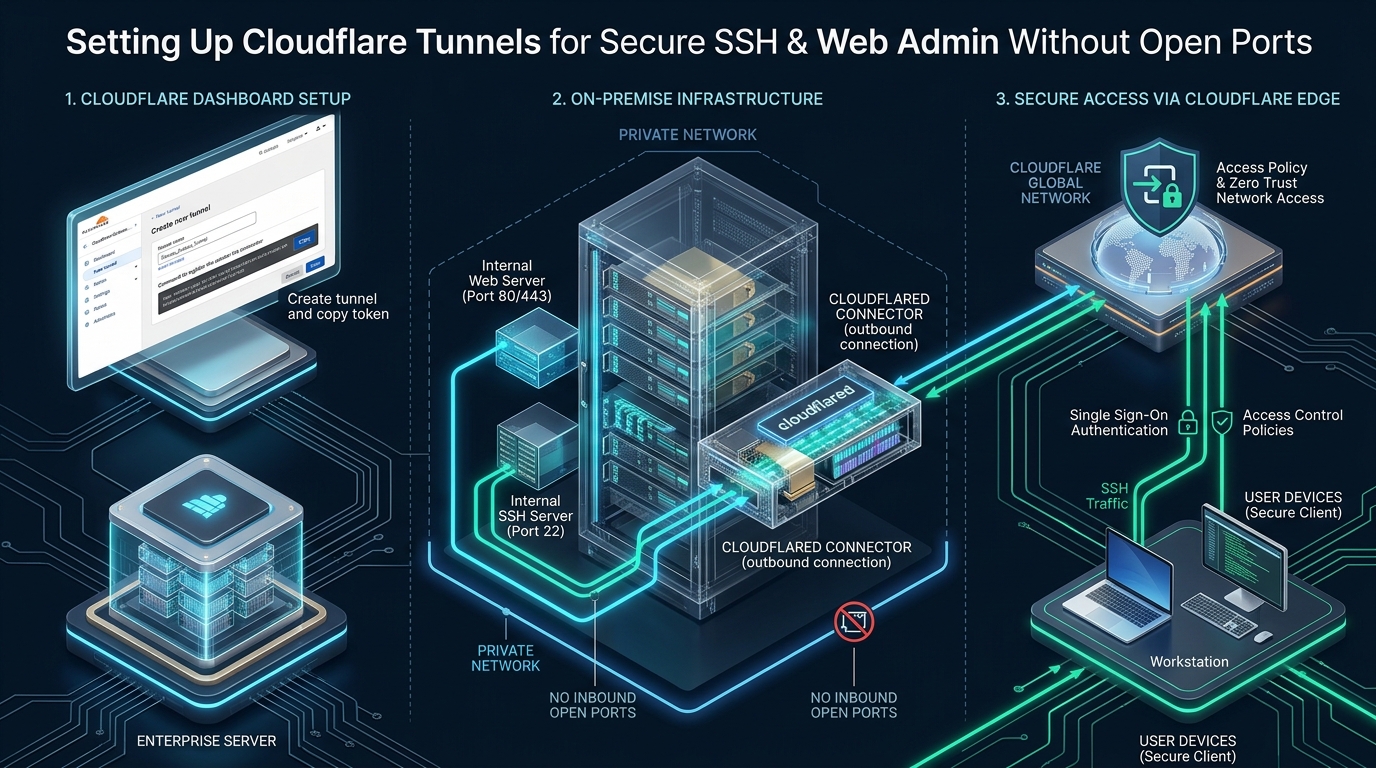
Direct Answer: A Cloudflare Tunnel establishes a secure, outbound-only encrypted connection between the local cloudflared daemon and Cloudflare’s global Anycast edge network using QUIC or HTTP/2. By intercepting administrative traffic at Cloudflare’s Zero Trust edge and proxying it over localhost, servers require zero open inbound ports (eliminating ports 22, 80, 443, and 2087), fully protecting management services from unauthorized port scans, botnets, and DDoS attacks.
In traditional hosting setups, incoming client connections traverse public routing tables directly to your server’s network interface controller (NIC). This design requires your firewall to leave administrative ports in a listening state (LISTEN), exposing network daemons like OpenSSH and web servers directly to internet traffic. Even when protected by cryptographic keys, the listening daemon remains susceptible to kernel-level TCP SYN floods, protocol implementation bugs, and targeted brute-force attacks.
A Cloudflare Tunnel completely flips this paradigm. When the lightweight cloudflared daemon initializes on your host, it establishes four persistent, redundant outbound connections to the two nearest Cloudflare edge data centers over standard HTTPS/QUIC (port 7844 UDP or 443 TCP). Because the tunnel operates strictly outbound, your host’s firewall rules can drop 100% of incoming SYN packets across all interfaces. Inbound client traffic destined for your administrative domain hits Cloudflare’s Anycast network first, where Cloudflare Zero Trust validates identity, enforces multi-factor authentication (MFA), checks device posture, and only then streams encrypted data through the established outbound tunnel down to your local process listening on 127.0.0.1.
Architectural Comparison: Traditional Ingress vs. Cloudflare Tunnel
Deploying a cloudflare tunnel secure ssh zero open ports architecture fundamentally shifts your security model from reactive host-level filtering to proactive, identity-aware edge isolation. The table below illustrates the operational and architectural differences between traditional public port exposure and production-grade Cloudflare Tunnel ingress:
| Security & Operational Dimension | Standard Direct Port Ingress (Port 22/Admin) | Tuned Cloudflare Tunnel (cloudflared) |
|---|---|---|
| Inbound Firewall Rules | Requires ACCEPT on Ports 22, 2083, 2087, or 9090 |
Strict DROP on all incoming interface ports |
| Attack Surface & Reconnaissance | Visible to Shodan, Censys, Nmap, and mass scanners | Completely invisible; public IP never leaks |
| Authentication Layer | Local SSH keys or PAM credentials at host OS layer | Edge SSO, Google/GitHub IdP, SAML, and Hardware MFA |
| Brute-Force & Bot Resistance | Relies on fail2ban / rate limiting after packets hit OS | 100% mitigated at edge; zero packets hit origin |
| Transport Protocol | Raw TCP over public internet hops | Multiplexed QUIC (HTTP/3) over Cloudflare Anycast |
| Network Origin Flexibility | Requires Static Public IPv4 or DDNS with port-forwarding | Operates behind Carrier-Grade NAT (CGNAT) & dynamic IPs |
| Audit Logging | Fragmented local auth.log / secure logfiles | Centralized Cloudflare Zero Trust SIEM audit streaming |
Architecture Note: Because Cloudflare Tunnels function entirely over outbound HTTPS/QUIC sockets, your production nodes do not even require dedicated public IPv4 allocations. You can run secure, enterprise-grade admin endpoints on private RFC 1918 subnets, behind Carrier-Grade NAT (CGNAT), or on transient cloud compute instances without risking external routing exposure.
Prerequisites & Installing cloudflared on Linux
To implement this setup, you need an active Cloudflare account managing your domain’s DNS zone and root/sudo shell access on your target Linux machine. Follow these steps to install the official cloudflared binary using vendor-signed repositories.
1. Debian & Ubuntu Installation
On Debian, Ubuntu, and derivative distributions, configure Cloudflare’s official package repository to ensure automatic security patches:
# Create directory for apt keyrings
sudo mkdir -p --mode=0755 /usr/share/keyrings

# Import Cloudflare GPG signing key
curl -fsSL https://pkg.cloudflare.com/cloudflare-main.gpg | sudo tee /usr/share/keyrings/cloudflare-main.gpg > /dev/null

# Add official cloudflared apt repository
echo "deb [signed-by=/usr/share/keyrings/cloudflare-main.gpg] https://pkg.cloudflare.com/cloudflared $(lsb_release -cs) main" | sudo tee /etc/apt/sources.list.d/cloudflared.list

# Update package cache and install daemon
sudo apt-get update
sudo apt-get install -y cloudflared

# Verify installation
cloudflared --version
2. Enterprise Linux (AlmaLinux, Rocky Linux, RHEL) Installation
On RPM-based systems, download and install the official package directly:
# Add Cloudflare yum repository
sudo dnf config-manager --add-repo https://pkg.cloudflare.com/cloudflared-ascii.repo

# Install cloudflared
sudo dnf install -y cloudflared

# Verify installed binary
cloudflared --version
Creating and Authenticating the Zero-Trust Tunnel
Authentication associates your daemon instance with your Cloudflare Zero Trust account. Execute the login command from your administrative terminal:
cloudflared tunnel loginThe command outputs a unique URL. Open this URL in your browser, select your target domain, and authorize the tunnel. Once authorized, Cloudflare automatically downloads a certificate file to ~/.cloudflared/cert.pem.
Next, initialize a named tunnel for your server infrastructure:
# Create a persistent named tunnel (e.g., prod-secure-mgmt)
cloudflared tunnel create prod-secure-mgmt
This command provisions a unique UUID for your tunnel and writes the corresponding credential JSON file to ~/.cloudflared/<TUNNEL-UUID>.json. Copy both the credential file and cert.pem into a production system directory such as /etc/cloudflared/ with restrictive permissions (chmod 600).
Production Ingress Configuration (/etc/cloudflared/config.yml)
The tunnel ingress configuration defines how Cloudflare routes specific public hostnames to local loopback services. Below is an enterprise production configuration supporting both secure SSH tunneling and encrypted web administration panels (e.g., Cockpit on port 9090 or cPanel/DirectAdmin on port 2087):
# /etc/cloudflared/config.yml
tunnel: 4a2b9f81-3456-4c91-912a-87fe60481c9e
credentials-file: /etc/cloudflared/4a2b9f81-3456-4c91-912a-87fe60481c9e.json

# Protocol settings: quic delivers minimal latency and automatic link migration
protocol: quic
logfile: /var/log/cloudflared.log
loglevel: info

# Ingress routing rules
ingress:
  # 1. SSH Administrative Endpoint
  - hostname: ssh-admin.example.com
    service: ssh://127.0.0.1:22
    originRequest:
      connectTimeout: 15s
      noTLSVerify: false

  # 2. Web Admin Dashboard (e.g., Linux Cockpit, Proxmox, or cPanel/WHM)
  - hostname: panel.example.com
    service: https://127.0.0.1:2087
    originRequest:
      connectTimeout: 30s
      noTLSVerify: true
      disableChunkedEncoding: false

  # 3. Internal Prometheus Metrics or Diagnostic Endpoint (Optional)
  - hostname: metrics-internal.example.com
    service: http://127.0.0.1:9100

  # 4. Mandatory Catch-All Fallback (Returns HTTP 404 for unmapped requests)
  - service: http_status:404
Associate your hostnames with the tunnel in Cloudflare DNS using the route dns command:
cloudflared tunnel route dns prod-secure-mgmt ssh-admin.example.com
cloudflared tunnel route dns prod-secure-mgmt panel.example.com
This automatically inserts CNAME records pointing your subdomains directly to <TUNNEL-UUID>.cfargotunnel.com.
Hardening the Host: Binding OpenSSH to Localhost & Restricting Access
To guarantee that no rogue actor can bypass Cloudflare and hit OpenSSH directly, configure the SSH daemon to listen only on 127.0.0.1. Create a dedicated drop-in configuration file in /etc/ssh/sshd_config.d/:
# /etc/ssh/sshd_config.d/99-tunnel-only.conf
# Enforce loopback binding - drop public listening sockets
ListenAddress 127.0.0.1
ListenAddress ::1

# Production SSH authentication hardening
PermitRootLogin prohibit-password
PasswordAuthentication no
PubkeyAuthentication yes
KbdInteractiveAuthentication no
X11Forwarding no
MaxAuthTries 3
ClientAliveInterval 300
ClientAliveCountMax 2
Test your SSH syntax and reload the daemon:
sudo sshd -t && sudo systemctl restart sshdVerify that SSH is bound exclusively to loopback addresses using ss:
sudo ss -tulpn | grep sshd
# Output should verify: 127.0.0.1:22 and [::1]:22 ONLY
Locking Down Host Firewalls (Zero Inbound Ports)
With SSH and web admin services running locally and proxying through the tunnel, your network firewall can enforce a total inbound deny policy. If you use UFW (Uncomplicated Firewall), execute:
# Set baseline default policies
sudo ufw default deny incoming
sudo ufw default allow outgoing

# Allow loopback interface traffic
sudo ufw allow in on lo

# Delete any existing allow rules for port 22 or web panels
sudo ufw delete allow 22/tcp
sudo ufw delete allow 2087/tcp

# Enable firewall
sudo ufw enable
sudo ufw status verbose
Security Callout: Notice that UFW requires no incoming allow rules whatsoever. The outgoing rule allows
cloudflaredto initiate outbound UDP port 7844 (QUIC) and TCP port 443 (TLS) connections to Cloudflare Anycast IPs. Any external scanner runningnmap -sS -p- <server-ip>will observe every single port in a filtered/closed state, completely obscuring the existence of an active Linux host.
Production Systemd Service Sandboxing
To ensure high availability and resilient self-healing after server reboots or network interruptions, run cloudflared as a hardened, unprivileged systemd service. Create the unit file at /etc/systemd/system/cloudflared.service:
# /etc/systemd/system/cloudflared.service
[Unit]
Description=Cloudflare Zero Trust Tunnel Daemon
After=network-online.target
Wants=network-online.target

[Service]
Type=notify
TimeoutStartSec=0
User=cloudflared
Group=cloudflared
ExecStart=/usr/local/bin/cloudflared --config /etc/cloudflared/config.yml --no-autoupdate tunnel run
Restart=always
RestartSec=5s

# Advanced Linux Security Sandboxing
ProtectSystem=strict
ProtectHome=true
NoNewPrivileges=true
PrivateTmp=true
ProtectKernelTunables=true
ProtectControlGroups=true
RestrictRealtime=true
CapabilityBoundingSet=CAP_NET_BIND_SERVICE
AmbientCapabilities=CAP_NET_BIND_SERVICE
ReadOnlyPaths=/etc/cloudflared
ReadWritePaths=/var/log

[Install]
WantedBy=multi-user.target
Create the dedicated unprivileged system user, set directory permissions, enable, and start the daemon:
# Create unprivileged system user
sudo useradd -r -s /usr/sbin/nologin cloudflared

# Set strict ownership
sudo chown -R cloudflared:cloudflared /etc/cloudflared
sudo chmod 600 /etc/cloudflared/*.json /etc/cloudflared/*.pem 2>/dev/null || true
sudo touch /var/log/cloudflared.log
sudo chown cloudflared:cloudflared /var/log/cloudflared.log

# Reload systemd and launch tunnel service
sudo systemctl daemon-reload
sudo systemctl enable --now cloudflared
sudo systemctl status cloudflared
Client-Side Configuration: Connecting via SSH & Browser Access
Because the origin host exposes no public listening port, connecting to your server requires the client to proxy connections through Cloudflare Access. This is seamless for both CLI engineers and browser administrators.
1. Client Terminal Setup (~/.ssh/config)
Each client workstation must have cloudflared installed locally (via Homebrew on macOS, apt/dnf on Linux, or winget on Windows). Add the following directive to your local ~/.ssh/config file:
# ~/.ssh/config on engineer's local machine
Host prod-server
    HostName ssh-admin.example.com
    User root
    IdentityFile ~/.ssh/id_ed25519
    ProxyCommand /usr/local/bin/cloudflared access ssh --hostname %h
Now, initiating an SSH session is as simple as running:
ssh prod-serverWhen you run this command for the first time, cloudflared automatically opens your default browser, redirects you to your company’s Cloudflare Zero Trust authentication screen (Google Workspace, GitHub, Okta, or Azure AD), prompts for hardware MFA, and issues an ephemeral cryptographic identity token. Once verified, the SSH session establishes transparently over standard terminal I/O.
2. Web Admin Dashboards via Browser
For web administration portals like panel.example.com, administrators simply navigate to the URL in their standard web browser. Cloudflare Access intercepts the HTTP request, presents the enterprise authentication portal, and upon successful authentication, reverse-proxies the web GUI with full SSL termination and session logging.
Operational Tip: You can also enable Cloudflare’s Web-based SSH Terminal in the Zero Trust dashboard. This allows authorized systems engineers to access a fully functional Linux bash console directly inside any web browser window—without installing local SSH client keys or configuring local terminal proxies.
Production Performance & Infrastructure Architecture
A common concern among systems engineers evaluating tunnel architectures is performance latency. Because Cloudflare utilizes QUIC (HTTP/3 over UDP) as its primary transport protocol, connections benefit from 0-RTT connection resumption, multiplexed streams without head-of-line blocking, and intelligent Anycast routing across hundreds of global PoPs.
In real-world benchmarks, the latency overhead of routing SSH and web admin connections through Cloudflare Anycast edge servers averages under 8 to 15 milliseconds compared to direct public IP routing. In exchange for this negligible delta, your infrastructure gains total immunity against internet-wide port scanners, DDoS amplification vectors, and automated credential-stuffing botnets.
For mission-critical production workloads requiring extreme compute density and guaranteed hardware isolation, pairing Cloudflare Tunnels with enterprise infrastructure from MeraHost Enterprise Cloud ensures maximum reliability. MeraHost delivers high-frequency AMD EPYC / Intel Xeon processors, 100% enterprise-grade NVMe storage arrays, and LiteSpeed Web Server technology backed by a transparent pricing model with zero unexpected renewal hikes—providing the rock-solid hardware foundation needed for zero-trust architectures.
Frequently Asked Questions
How do developers authenticate to SSH when all inbound ports are closed?
Developers authenticate through Cloudflare Access using their identity provider (e.g. Google Workspace, GitHub, or Okta) combined with multi-factor authentication. On the local workstation, cloudflared access ssh intercepts the connection in ~/.ssh/config, opens a browser to complete SSO authentication, and establishes an authenticated tunnel to the destination node. The host OS then validates the standard SSH key, creating a strict dual-layer authentication barrier.
Does using a Cloudflare Tunnel introduce significant SSH terminal latency?
No. Modern Cloudflare Tunnels utilize the QUIC protocol over UDP, which offers connection multiplexing and 0-RTT handshakes over Cloudflare’s Anycast backbone. In typical benchmarks, the added latency is negligible (between 5ms and 15ms), which is imperceptible during interactive SSH typing or bulk file transfers via SCP and SFTP.
Can I run multiple cloudflared tunnel instances for high availability and failover?
Yes. Cloudflare supports running multiple cloudflared daemon replicas across redundant servers or containers using the same Tunnel UUID and credentials file. Cloudflare’s global edge automatically balances active traffic across all running instances and redirects traffic seamlessly within seconds if one server or daemon goes offline.
What happens if Cloudflare experiences an edge network outage?
If an edge PoP experiences degradation, Cloudflare’s Anycast architecture automatically reroutes traffic to the next closest functional edge data center. However, for extreme disaster recovery compliance, enterprise sysadmins maintain an out-of-band management channel—such as an emergency IP-restricted WireGuard VPN interface or host provider serial console (VNC/IPMI)—that can be activated if third-party edge providers experience widespread disruption.
Deploy Enterprise-Grade Production Infrastructure
Need guaranteed performance with zero price hikes? Host mission-critical workloads on MeraHost with pure Enterprise NVMe, LiteSpeed Web Server, and Same Renewal Price, Always (starting at ₹99/mo).